How To Service a Vaillant Ecotec Boiler (Natural Gas)
To see the tasks that need to be carried out on most boilers see the following article: Boiler Service
Inspection and maintenance work steps
| Number | Activity | Inspection carried out Annually | Inspection carried out at regular intervals |
|---|---|---|---|
| 1 | Check the air flue gas installation for leaks and for proper fixation and ensure it is not blocked or damaged and is fitted correctly, complying with the relevant installation instructions. | X | X |
| 2 | Carry out a general inspection of the boiler for dirt and dust and clean as necessary | X | X |
| 3 | Visually inspect the complete heat engine for its general condition and for signs of corrosion, sooting or other forms of damage (paying particular attention to the burner door seal). If damage is evident proceed to column 2. | X | X |
| 4 | Measure the gas flow rate during operation with maximum load. If the gas flow rate complies continue with column 1, if not proceed to column 2. | X | X |
| 5 | Check the gas inlet working pressure operation with maximum load. If the gas inlet working pressure complies continue with column 1, if not proceed to column 2. | X | X |
| 6 | Check combustion by measuring CO, CO2 and CO/CO2. If the values are outside the tolerances proceed to maintenance column 2. You must not proceed with the maintenance if a new burner door seal kit is not available | X | |
| 7 | Isolate the boiler from the power mains. Check whether the electrical plug connections and the other electrical connections are fitted tightly and correct them if necessary. | X | X |
| 8 | Close the gas isolation valve and the service valves. | X | |
| 9 | Drain the pressure in the boiler on the water side (observe pressure gauge) and check the charge pressure of the expansion vessel. Top up if necessary | X | |
| 10 | Only with VUW boilers with actoSTOR: Check the charge pressure in the expansion vessel of the layered storage tank. Correct the pressure if necessary. | X | X |
| 11 | Remove the compact thermal module. | X | |
| 12 | Check the integrity of all combustion circuit seals, especially the burner door seal. Ensure any damage found is repaired before proceeding. | X | |
| 13 | Clean the heat exchanger. | X | |
| 14 | Check whether the burner is dirty and clean it if necessary. | X | |
| 15 | Check the condensate siphon in the boiler, clean and fill. Flush through all discharge pipe work (ensure route and termination are correct and it is unlikely to freeze up in severe weather). | X | X |
| 16 | Install the compact thermal module. Caution: Use new seals and nuts! | X | |
| 17 | For VUW boilers: Replace the hot water heat exchanger if the volume of water is insufficient or the output temperature is not reached | X | |
| 18 | For VUW boilers: Remove the impeller sensor, clean the filter in the cold water inlet of the sensor and refit the sensor. | X | |
| 19 | Service the domestic hot water cylinder (see note below). | X | X |
| 20 | Open the gas isolation valve, reconnect the boiler with the power mains and switch on the boiler. | X | X |
| 21 | Open the service valves and fill up the boiler/appliance to approximately 0,1 – 0,2 MPa (1,0 – 2,0 bar) (depending on the static height of the system). Start the purging program P.00 | X | |
| 22 | Perform a test operation of the boiler and heating installation, including hot water generation and purge again if necessary | X | X |
| 23 | Perform the gas family check. | X | |
| 24 | Check visually the ignition and burner performance. | X | X |
| 25 | Check the boiler for leaks of any kind (gas, flue gas, water, condensate) and rectify as necessary. | X | X |
| 26 | If you had problems with the CO, CO2, CO/CO2-values in Step 6 before the maintenance, check them again now. If they are outside of the tolerances make an adjustment. | X | |
| 27 | Complete the Benchmark gas boiler commission service record on the back pages of this manual. | X | X |
* Additional checks and procedures will be required where the boiler is used with a cylinder or solar thermal system. These are not covered in this manual.
Combustion testing
Put the boiler into Full load using P.01 Mode. For older ecotecs reset boiler and immediately hold the "plus" button until P.00 shows up. Then press 'plus' button again to get to P.01. For newer ecotecs, go to Menu > Installer level > Test Programs > Test programs > Maximum load.
CO2 Limits
| Settings | Unit | Natural Gas (H) | Propane |
|---|---|---|---|
| CO2 after 5 minutes full (MAX) load mode with boiler front casing fitted | Vol.–% | 7.8 – 10.2 | 9.7 – 10.7 |
| CO2 after 5 minutes full (MAX) load mode with boiler front casing removed | Vol.–% | 7.6 – 10.0 | 9.5 – 10.5 |
| Set for Wobbe index Ws | 15 | 22.5 | |
| CO value with full load | < 250 | < 250 | |
| CO/CO2 | < 0.0031 | < 0.0026 |
Adjusting the CO2 concentration (or the air ratio)
Danger! Increased risk of poisoning due to incorrect settings! If one of the flue gas values is greater than the acceptable values then:
- Check the integrity of the complete flue gas installation.
- Check the integrity of the combustion circuit seals.
- Check the gas inlet working pressure.
- Check the gas flow rate.
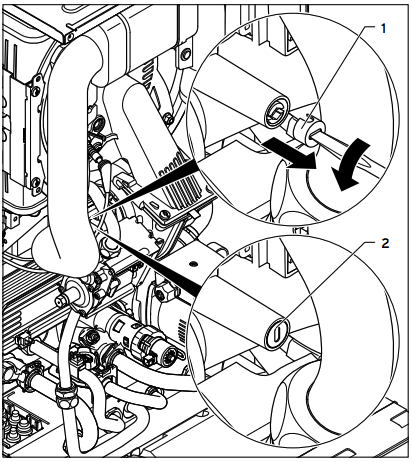
Removing the covering cap for the air ratio setting adjusting screw (gas setting) and making the air ratio setting
If the flue gas value needs to be adjusted, proceed as follows. The adjusting screw for making the air ratio setting is located beneath a covering cap, which is easy to unscrew.
- To do this, push a small slotted screwdriver through the covering cap at the mark and unscrew it.
- Set the relevant CO2 value by turning the screw. To do this, use a small slotted screwdriver or a 2.5 mm Allen key.
- Turn to the left: higher CO2 concentration
- Turn to the right: lower CO2 concentration
- Natural gas: Only perform the adjustment in increments of 1 turn and wait approximately 1 minute after each adjustment until the value stabilises.
- Liquid gas: Only perform the adjustment in small increments (approximately 1/2 turns), and wait approximately 1 minute after each adjustment until the value stabilises.
- Press the "Cancel" selection button once the settings have been adjusted.
- When the adjusting work is complete, screw the covering cap back in again.
- Put the front casing back on.